# Installation
# Requirements
- 2 GB RAM
- 20 GB storage
- 1 CPU
- RHEL-based OS:
- Rocky Linux 8.x / 9.x / 10.x
- AlmaLinux 8.x / 9.x / 10.x
- RHEL 8.x / 9.x / 10.x
- Containers are not supported (Virtuozzo, OpenVZ)
# Bootstrapper
Bootstrapper (opens new window) is an idempotent tool to continuously update and correct your server. If things drift, Bootstrapper is designed to provide the minimal set of enforcing changes to make your server work. You will always have free rein of your server as long as it doesn't impede upon the responsibility of ApisCP. Scopes provide guarded management points that are jointly managed by Bootstrapper.
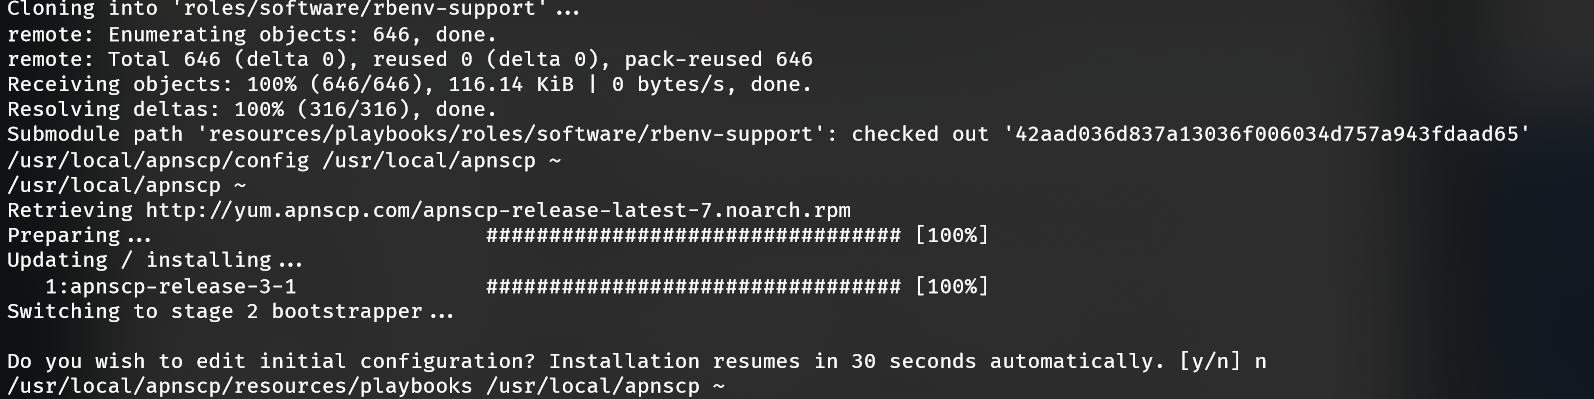
Bootstrapping is performed during installation and during integrity checks, run monthly. To begin, run the stub script. This can be downloaded from the GitHub (opens new window) repository. Customizations are provided through ApisCP's Customization Tool (opens new window).
curl https://raw.githubusercontent.com/apisnetworks/apnscp-bootstrapper/master/bootstrap.sh | bash
This command arms ApisCP with a 30 day license. If you have purchased a license via my.apiscp.com (opens new window), then the license may be provided at install by providing the token:
curl https://raw.githubusercontent.com/apisnetworks/apnscp-bootstrapper/master/bootstrap.sh | bash -s - <api token>
# Installation
Bootstrapping takes between 30 - 120 minutes depending upon features and provider capacity. Generally lower figures indicate more performant hardware provider, but performance can change as client densities change.
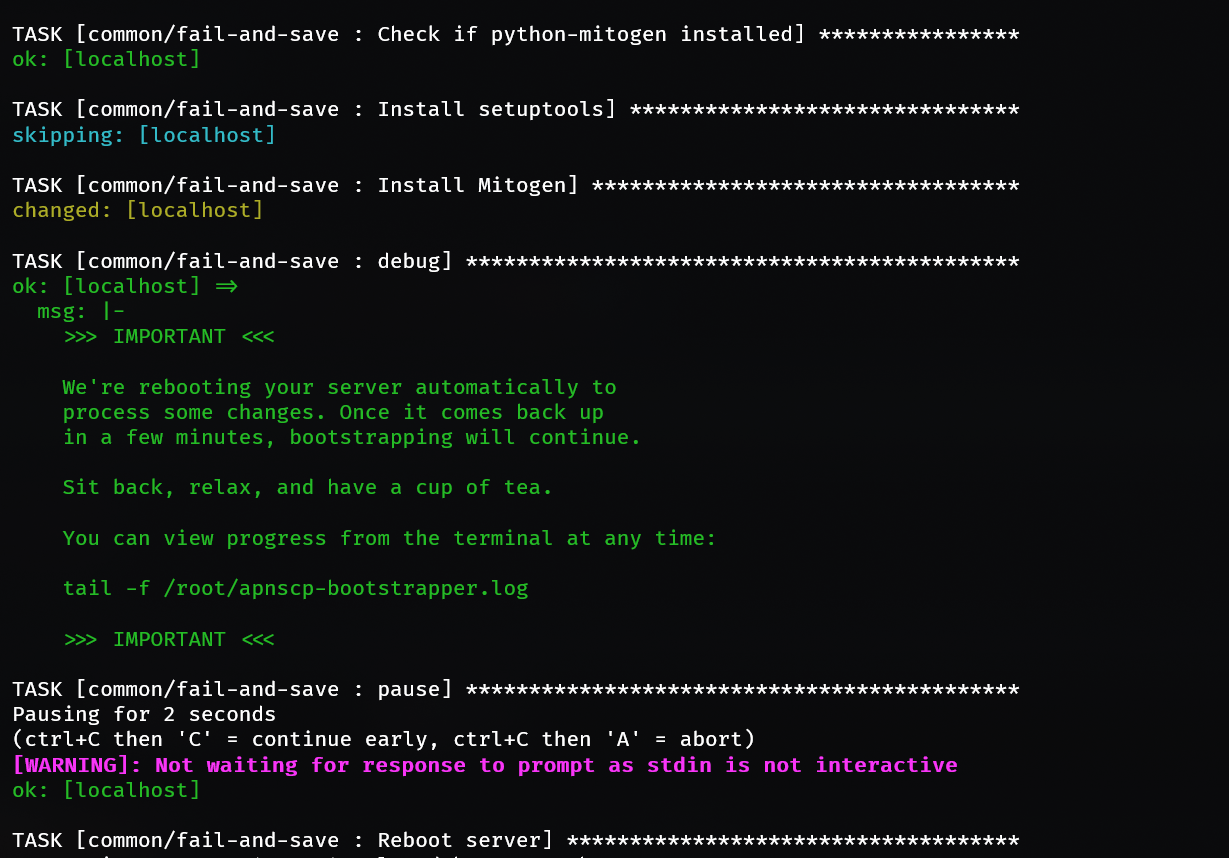
Before the bootstrap utility kicks off stage 2 (opens new window), you are given one last chance to customize installation. This is optional, but will allow you to immediately configure SSL. These values can be changed later with scope:set in the panel.
WARNING
All settings except for MariaDB and PostgreSQL may be changed after installation. Both MariaDB and PostgreSQL pose breaking changes between versions, e.g. 10.4 => 10.3 is impossible; all PostgreSQL minor changes require full dump + extension installation.
# Provisioning
Stage 2 is platform provisioning. During this stage one or more reboots may happen. ApisCP will automatically resume installation on reboot.
You can follow along using the following command:
tail -f /root/apnscp-bootstrapper.log
Installation is completed once Bootstrapper logs a similar line:
2021-01-16 03:46:28,096 p=1108 u=root n=ansible | PLAY RECAP *********************************************************************
2021-01-16 03:46:28,096 p=1108 u=root n=ansible | localhost                  : ok=1815 changed=722  unreachable=0    failed=0    skipped=553  rescued=1    ignored=15
As long as failed=0 appears, you're set!
After install, load a new shell with the correct ApisCP environment.
exec $SHELL -i
# After install
Domains that have a properly qualified FQDN will receive notification once ApisCP is installed. If not, the admin username/password/contact can be reconfigured at anytime using ApisCP's API helper.
cpcmd auth:change-username 'NEWUSER'
cpcmd auth:change-password 'NEWPASSWORD'
cpcmd common:set-email 'NEW@EMAIL.COM'
Setting all 3 will allow you to login to your new panel at http://IPADDRESS:2082/. (opens new window) If SSL has been setup, or you can trust a bespoke certificate, then use https://IPADDRESS:2083/. (opens new window) When logging in as admin, leave the domain field blank.
# Adding your first domain
# Within ApisCP
After logging into the panel as admin, visit Nexus. Services can be reconfigured within Nexus or from the command-line.

# From command-line
AddDomain creates a site from command-line. Multiple parameters can be provided to alter the services assigned to an account. Nexus within the Administrative panel is a frontend for this utility. admin_add_site is the backend API call (opens new window) for this command-line utility.
AddDomain -c siteinfo,domain=mydomain.com -c siteinfo,admin_user=myadmin
DETAILS
Creates a new domain named mydomain.com with an administrative user myadmin. The email address defaults to blackhole@apiscp.com and password is randomly generated.
# Editing domains
# Within ApisCP
Domains may be edited by clicking the SELECT button in Nexus.
# From command-line
EditDomain is a helper to change account state without removing it. You can toggle services and make changes in-place in a non-destructive manner. More advanced usage is available in the blog post, Working with CLI helpers (opens new window).
Rename domain A simple, common situation is to alter the primary domain of an account. Simply changing the domain attribute under the siteinfo service will accomplish this.
EditDomain -c siteinfo,domain=newdomain.com mydomain.com
Changing password Changing the password is another common operation:
EditDomain -c auth,tpasswd=newpasswd site12
# Logging into services
ApisCP uses username@domain notation to log into all services. This allows for multiple domains to share the same username without conflict. The only restriction is that the primary account username must be unique.
Unless the domain is explicitly required, such as when logging into the control panel or accessing MySQL remotely use @ or # to join the username + domain. For example, when logging into SSH as user foo on example.com, all are acceptable variations of ssh:
ssh -l foo@bar.com bar.com
ssh foo@bar.com@bar.com
ssh -l foo#bar.com bar.com
ssh foo#bar.com@bar.com
This can be further simplified by creating a file called config in ~/.sshwith the following lines,
Host bar
    HostName bar.com
    User foo#bar.com
Then, ssh bar will login to "bar.com" using the login "foo#bar.com".
As a second example, consider FTP. With the username myadmin + domain mydomain.com, the following configuration will allow access to the FTP server using explicit SSL (opens new window) (FTPES).
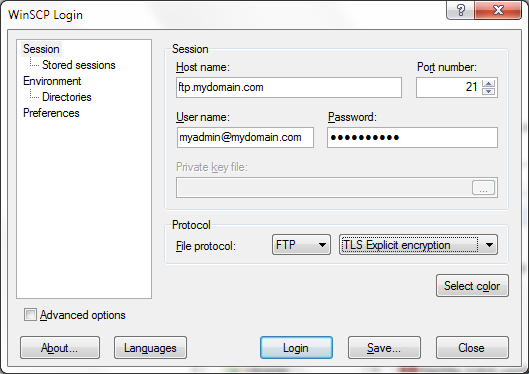
SFTP is supported if SSH is enabled for the account. ftp.DOMAIN is by convention, but using too the server name, server IP address, or domain name is also acceptable.
# Provisioning failures
DANGER
A variety of failures can occur during installation. These are designed to help you make the right decision in selecting a server. Analyzed situations include:
- Running experimental CentOS Plus kernels on stock images
- Underreported memory (2048 MB = 2 GB), 1790 MB is the least accepted when "has_low_memory" is not enabled
- Hardware problems
- Rogue Yum repositories
- Faulty sysctl parameters
ApisCP is robust enough to correct most failures. Contact help@apisnetworks.com if you have any questions.
Bootstrapper will continuously retry in the event of failure, pulling down updated code from ApisCP's repository before each attempt.
To stop the automatic retry, disable bootstrapper-resume service.
systemctl disable bootstrapper-resume
cd /usr/local/apnscp/resources/playbooks
ansible-playbook bootstrap.yml
# Examining the log
Installation is logged to /root/apnscp-bootstrapper.log. Typically, the last 20 lines are sufficient to determine failure context.
grep -m1 failed=1 -B20 /root/apnscp-bootstrapper.log
If no lines are returned, then no failure has occurred and you may need to wait longer for installation to complete. Installation should complete within 60 minutes. If installation does not complete within 90 minutes, then tread carefully as the server performance may be impaired.
# Network failures
Network connectivity is a common failure that can be caused by transient errors either in DNS resolution, which is unreliable by UDP protocol design, or network congestion. Network tasks use a built-in retry/wait algorithm to reduce the risk of failure - up to 3 retries with a 5 second wait in between attempts. Even this pragmatic approach to handling network interruptions can fail.
TASK [software/rbenv : Add GEM_HOME pathing support] *************************** 2019-03-05 12:42:19,129 p=8833 u=root | FAILED - RETRYING: Add GEM_HOME pathing support (3 retries left). 2019-03-05 12:46:38,839 p=8833 u=root | FAILED - RETRYING: Add GEM_HOME pathing support (2 retries left). 2019-03-05 12:50:58,550 p=8833 u=root | FAILED - RETRYING: Add GEM_HOME pathing support (1 retries left). 2019-03-05 12:55:18,270 p=8833 u=root | fatal: [localhost]: FAILED! => ...
The above fragment failed to download a repository off GitHub indicating possible DNS issues with the resolver configured on the machine. Replace the configured resolver with a reliable public DNS resolver (Google, Level3, Cloudflare) by editing /etc/resolv.conf. Remove all instances of nameserver and change the DNS timeout which defaults at 5 seconds. When using multiple nameservers, rotate in the options directive will round-robin resolvers to distribute lookups across all nameservers.
As of v3.0.29, ApisCP automatically replaces the machine's nameservers with CloudFlare, which consistently performs in the top tier (opens new window) of reliability and speed. This feature may be disabled with use_robust_dns. Alternate nameservers may be defined via dns_robust_nameservers, a list (see apnscp-internals.yml).
# Bootstrapper Configuration
# Recommended configuration
Bootstrapper can run without any changes to /root/apnscp-vars.yml. The following changes are recommended to make setup seamless. These settings are configured when the bootstrap utility pauses:
- apnscp_admin_email: (email address) used to set the admin contact. Notified when ApisCP is installed (FQDN required) as well as monthly maintenance notifications. This email address is also used as your Let's Encrypt admin contact.
- ssl_hostnames: (list or string) hostnames that resolve to this server that should be considered for Let's Encrypt SSL issuance.
- Examples:
- ['apiscp.com','hq.apiscp.com','nexus.apiscp.com']
- apiscp.com
- Examples:
# Optional settings
- has_low_memory: (true/false) disables auxiliary services for 2 GB instances. See low-memory mode below.
- user_daemons: (true/false) opens up ports 40000-49999/tcp + udp on the server for accounts that want to run a service. If you're running strictly PHP/Node/Python/Ruby services, turn this off for added security.
- mail_enabled: (true/false) if using GMail or a third-party email provider disables IMAP/POP3 + ESMTPA. Mail can still originate from the server (PHP mail() (opens new window)), but blocks ingress.
- passenger_enabled: (true/false) disable building Passenger + accompanying Ruby/Python interpreters if running a purely PHP mix. Node/npm/yarn is still available, but can't serve websites.
- mysqld_per_account_innodb: (true/false) places tables + data in an aggregate InnoDB pool for higher performance or per account for resource enforcement. An account over quota can cause a cyclic crash in MySQL/MariaDB 5.0+ on recovery. You have been warned. Ensure Argos (opens new window) is setup if enabled.
- data_center_mode: (true/false) ensure all resources that ApisCP can account for are accounted. Also enables the pernicious bastard
mysqld_per_account_innodb!
# Specialized roles
New in 3.2.45
After installation, the platform may be reconfigured on-the-fly for a specialized role using cp.role Scope. The table summarizes available modes of operation. All free licenses may be generated through my.apiscp.com (opens new window).
# Assign platform as a development server
cpcmd scope:set cp.role dev
| Role | Remarks | Free |
|---|---|---|
| data-center | mod_pagespeed and database quotas enforced. Service cache pooling. cp-proxy recommended. xfs filesystem highly recommended. | |
| default | Single node. Caches unshared among additional machines. | |
| dev | May only host .test TLDs. Operationally same a revolving monthly Pro license. | ✅ |
| dns-only | Cannot host domains. Intended for PowerDNS. | ✅ |
| low-memory | Pared down experience for use on 1 GB machines. | |
| proxy | For use with cp-proxy. Implies low-memory. Includes Nodejs support. | ✅ |
| supervisor | Management framework. No UI, no auxiliary services (ftp, http, mail). | ✅ |
# Setting FQDN for SSL/Email
All servers should have a fully-qualified domain name (FQDN (opens new window)). Failure to have one will cause email to fail, including the installation notice. Moreover, Let's Encrypt will fail issuance. A FQDN must at least contain 1 dot:
- ✅ apiscp.com
- ✅ cdn.bootstrap.org
- ✅ x.y.z.abc.co.uk
- ❌ centos-s-1vcpu-2gb-nyc1-01 (no period/dot)
Set your hostname with,
hostnamectl set-hostname MYHOSTNAME
Where MYHOSTNAME is your hostname for the machine. For consistency reasons, it is required that this hostname resolves to the IP address of the machine and vice-versa with FCrDNS (opens new window). Check with your DNS provider to establish this relationship.
Once ApisCP is setup it can be reconfigured anytime with,
cpcmd scope:set net.hostname MYHOSTNAME
SSL will automatically reissue as well as impacted services restart.
# Low-memory mode
ApisCP is designed to work on 2 GB+ machines, but can work on 1 GB machines with minor finagling. Enabling has_low_memory scrubs non-essential services. It converts the job daemon to a single worker; disables Passenger, including support for Python, Ruby, Node, and Meteor applications; and removes vscanner, which is a combination of mod_security + ClamAV to scrub uploads. This frees up ~700 MB of memory.
If no mail services are required, setting mail_enabled to false also disables Dovecot and haproxy freeing up an additional 60 MB. Setting rspamd_enabled to false (policy milter, outbound spam filtering, DKIM/ARC signing) will free a further 125 MB if rspamd is used for mail filtering (see spamfilter setting).
Setting ftp_enabled=false disables vsftpd, which may modestly reduce memory pressure. WordPress, when configured in this manner, will require SFTP to manage files. Low-memory mode disables PHP-FPM by default, which improves memory usage at the consequence of higher latency and reduced security through global filesystem visibility beyond open_basedir limits.
On a 1 GB machine, disabling all non-essential services, ~500 MB is usable with the following provisioning snippet:
curl https://raw.githubusercontent.com/apisnetworks/apnscp-bootstrapper/master/bootstrap.sh | bash -s - -s use_robust_dns='true' -s dns_default_provider='null' -s has_low_memory='true' -s passenger_enabled='false' -s mail_enabled='false' -s ftp_enabled='false'
# Headless mode
ApisCP can run in headless mode, that is to say without a front-end UI. This can further save on memory requirements and keep your site secure.
Set panel_headless to true to activate headless mode. In headless mode, you are limited to CLI helpers - cpcmd, AddDomain, EditDomain, DeleteDomain. Fear not though! Anything that can be done through the panel can be done from CLI as the API is 100% reflected.
This mode can be quickly toggled after setup using a configuration scope: cpcmd scope:set cp.headless true.
# DNS overrides
DNS servers are altered when use_robust_dns=true. From observation, many providers have substandard DNS clusters for usage that can create transient network issues that are very hard to debug. We recommend using CloudFlare's DNS servers, but others work similarly.
| Provider | Server |
|---|---|
| 8.8.8.8 | |
| 8.8.4.4 | |
| Cloudflare | 1.1.1.1 |
| 1.0.0.1 | |
| Level3 | 4.2.2.2 |
| 4.2.2.1 | |
| Quad9 | 9.9.9.9 |
| Dyn | 216.146.35.35 |
| 216.146.36.36 |
Original /etc/resolv.conf
# Generated by NetworkManager
search apisnetworks.com
nameserver 64.22.68.59
nameserver 64.22.68.60
Revised /etc/resolv.conf
# Generated by NetworkManager
search apisnetworks.com
options timeout:30 rotate
nameserver 1.1.1.1
nameserver 8.8.8.8
# Updating ApisCP
ApisCP can be configured to automatically update itself every night using scope:set
cpcmd scope:set cp.nightly-updates 1
Alternatively ApisCP can be updated manually withupcp. Playbooks can be run unconditionally using upcp -b or upcp -a if resources/playbooks has changed since last update.
# Further reading
- hq.apiscp.com (opens new window) - ApisCP blog, periodic how-tos are posted
- docs.apiscp.com (opens new window) - ApisCP documentation